Power BI
TIP
This guide showcases the integration capabilities of ACE360 Connect, but please be aware that we are not able to provide direct support for Power BI implementations.
This example will show you how to get apprentice data into Microsoft Power BI so you can start building simple reports.
At the end of this example you should be able to query the ACE360 Connect API, get apprentice data, and be able to start using that data in your own reports. Remember, this is just an example feel free to try different things and pick data that would be relevant to you.
Contents
Getting Started
If you don't already have Power BI installed, click here to download it.
Getting Your Data
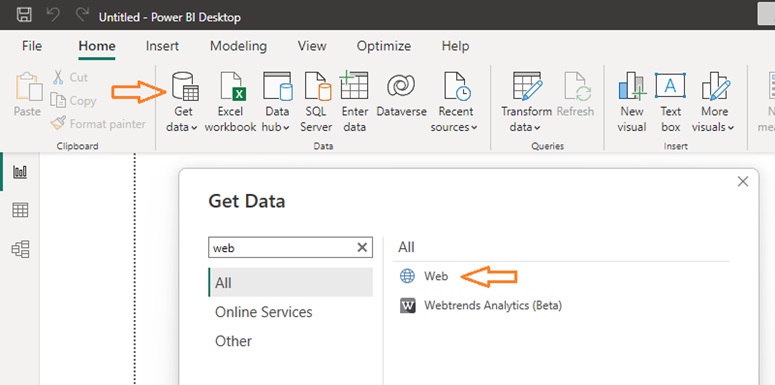
Start by clicking get data and search for "web" like so:
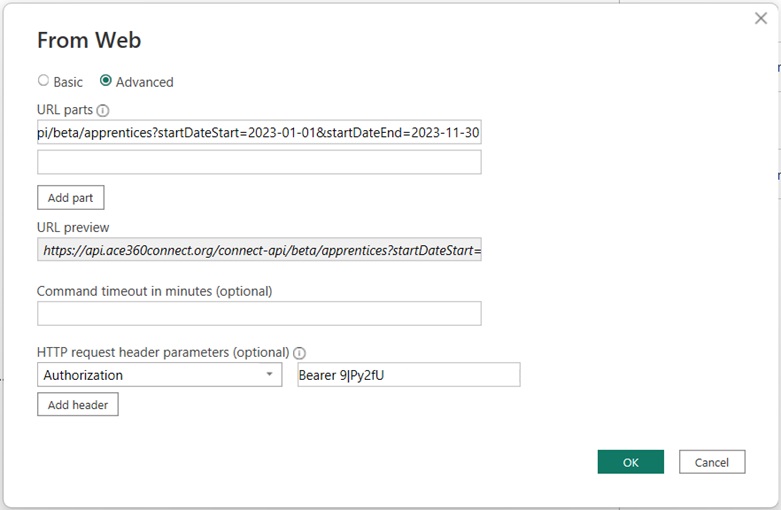
Click advanced and fill out input boxes:
Your API key will need to be entered like this: Bearer 2|xYzAbC......
The URL shown here has a start and end date applied at the end of the URL, this can be removed/amended https://api.ace360connect.org/connect-api/beta/apprentices?startDateStart=2023-01-01&startDateEnd=2023-11-30
In Parameters, type in Authorization and paste in your API token WITH “Bearer” at the start.
Bearer 9|AbCdE12345
Please bear in mind, your API token will differ from the one above, to generate a token, please login to the connect dashboard.
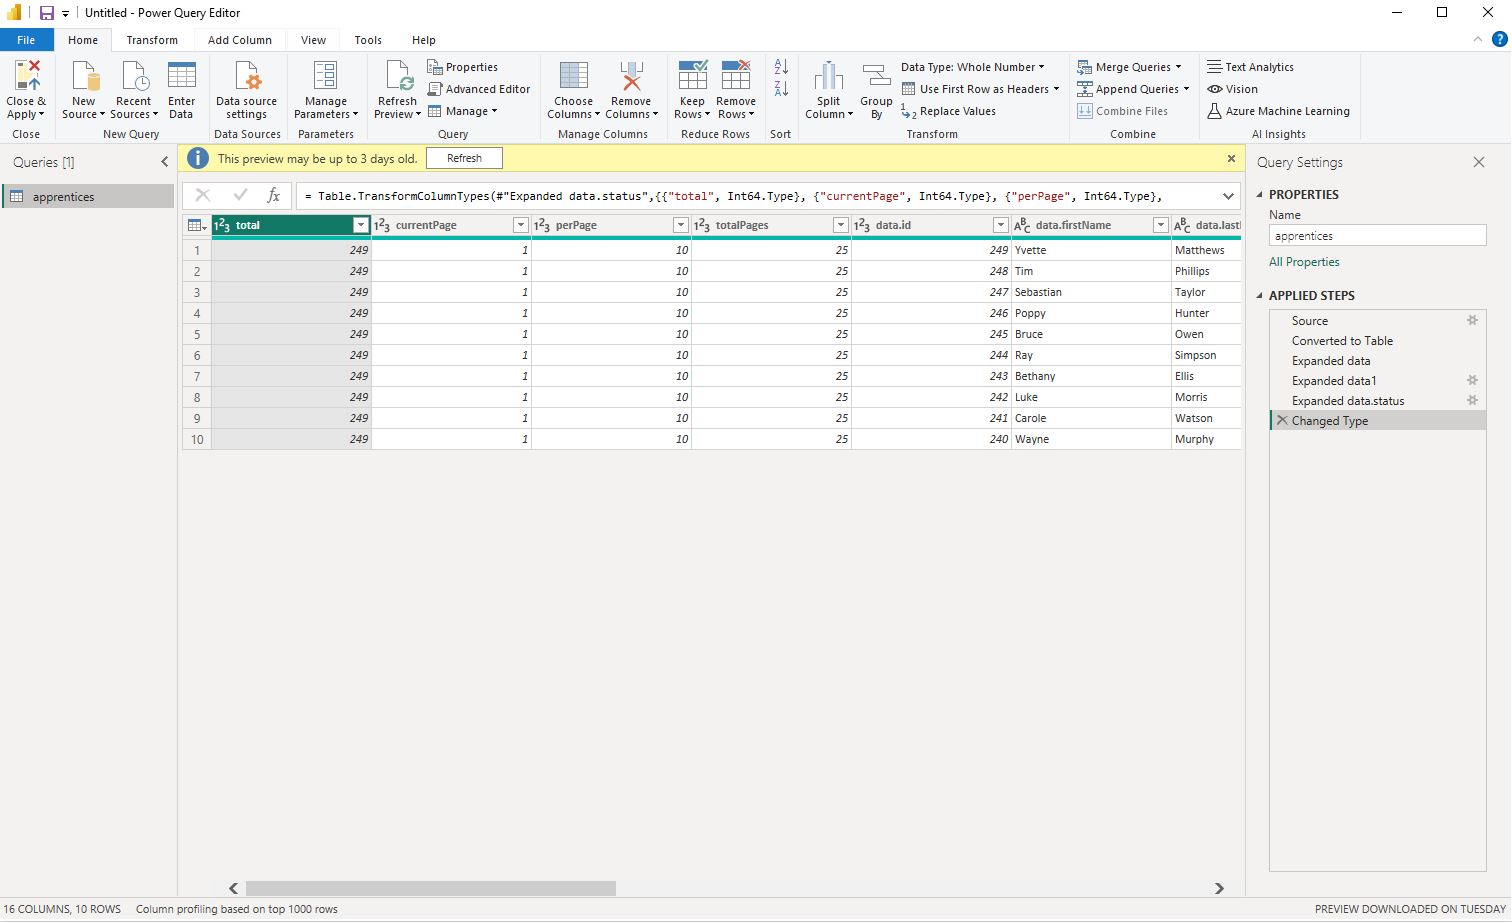
Once filled out and submitted, if your connection has worked you'll see something simialr to this:
This is great, but you might notice fewer results than expected. That's because ACE360 Connect endpoints are paginated. Pagination is a way of chunking large results sets so as to not overwhelm our systems, or yours.
Don't worry though, we're about to explain how you get all of your results.
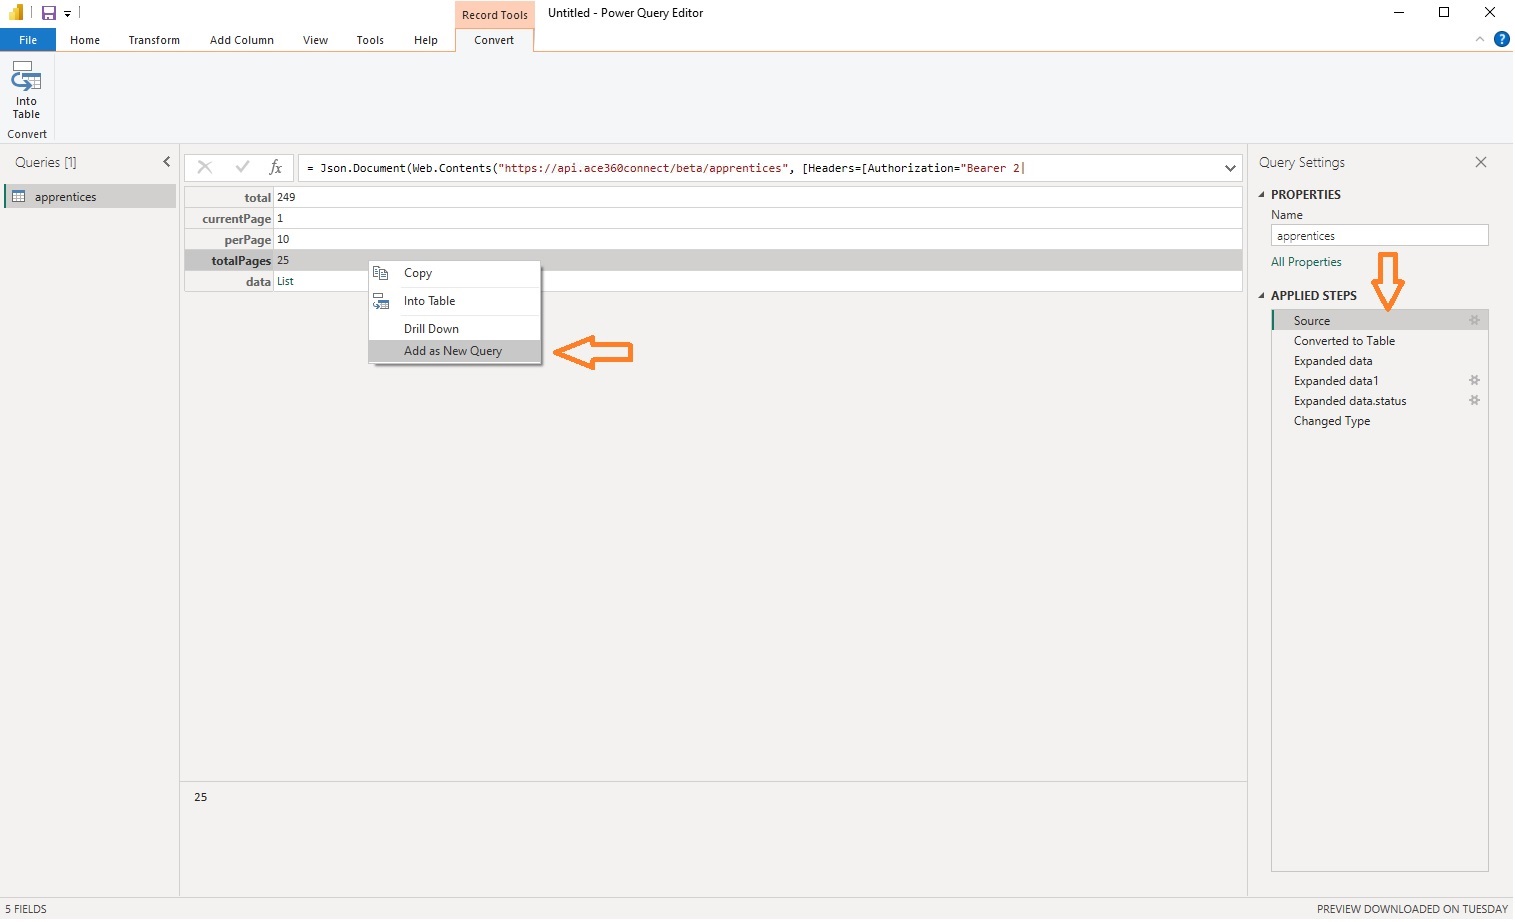
In order to see more results, Select "Source" in the "Applied Steps" pane.
Then right click on the numbers next to the totalPages value and select "Add as New Query".
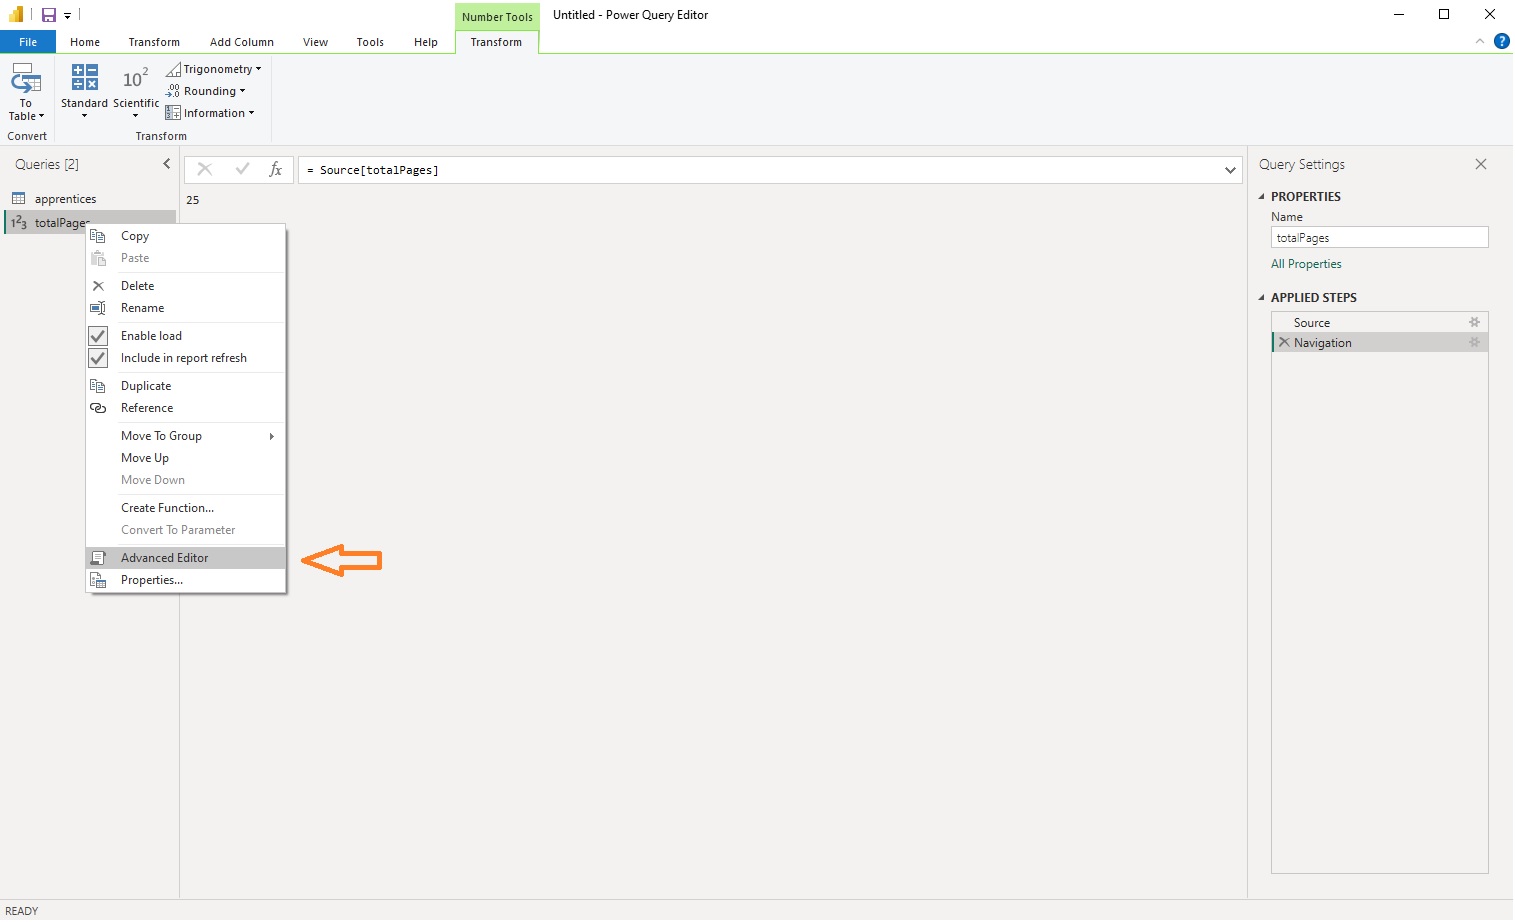
Right click on your new totalPages query in the "Queries" pane on the left and select "Advanced Editor".
In the new window that has popped up, find the 3 lines that look like this:
totalPages1 = Source[totalPages]
in
totalPages1
and change them to:
List = {1..Source[totalPages]}
	in
	List
Click done.
Finally, convert totalPages to a table using the "To Table" option at the top left.
Click OK in the next window.
Don't apply your changes yet.
The next step is to modify the original query. Like we did for the totalPages query, right click and select "Advanced Editor".
There will be three places we need to modify in the next window:
At the start, type in: (page as text) =>
You'll also need to add ?page=" & page to the end of the URL so
Would look like this:
"https://api.ace360connect.org/connect-api/beta/apprentices?startDateStart=2023-01-01&startDateEnd=2023-11-30&page=" & page, [Headers=
Then, change “Changed Type” before and after “In” to “Expanded Column1”
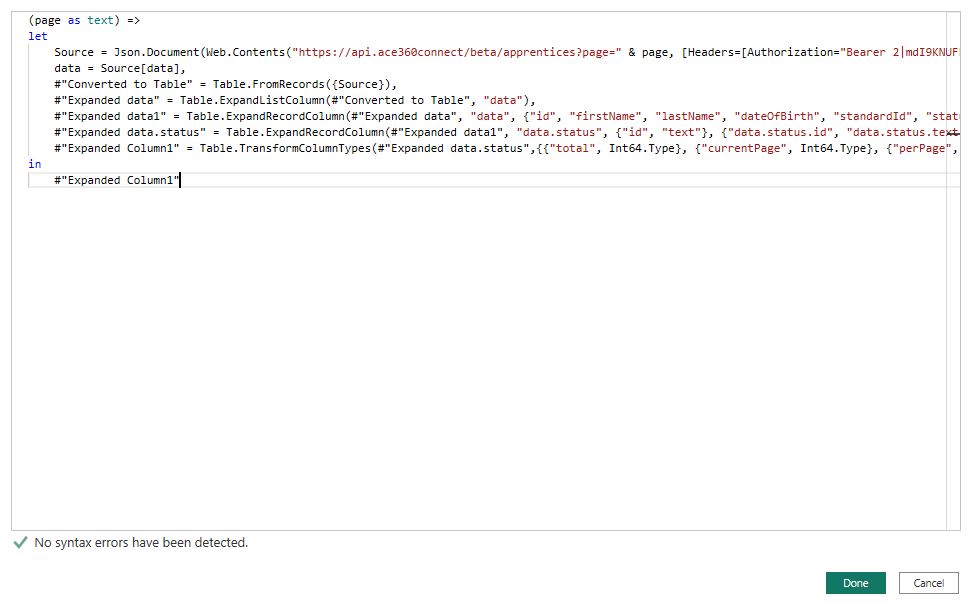
It should look something like this:
The complete query:
(page as text) =>
let
    Source = Json.Document(Web.Contents("https://api.ace360connect.org/connect-api/beta/apprentices?startDateStart=2023-01-01&startDateEnd=2023-11-30?page=" & page, [Headers=[Authorization="YOUR FULL BEARER TOKEN HERE"]])),
    data = Source[data],
    #"Converted to Table" = Table.FromRecords({Source}),
    #"Expanded data" = Table.ExpandListColumn(#"Converted to Table", "data"),
    #"Expanded data1" = Table.ExpandRecordColumn(#"Expanded data", "data", {"id", "firstName", "lastName", "dateOfBirth", "standardId", "status", "estimatedStartDate", "estimatedEndDate", "esfaCertificateClaimedAt", "createdAt", "archivedAt"}, {"data.id", "data.firstName", "data.lastName", "data.dateOfBirth", "data.standardId", "data.status", "data.estimatedStartDate", "data.estimatedEndDate", "data.esfaCertificateClaimedAt", "data.createdAt", "data.archivedAt"}),
    #"Expanded data.status" = Table.ExpandRecordColumn(#"Expanded data1", "data.status", {"id", "text"}, {"data.status.id", "data.status.text"}),
    #"Expanded Column1" = Table.TransformColumnTypes(#"Expanded data.status",{{"total", Int64.Type}, {"currentPage", Int64.Type}, {"perPage", Int64.Type}, {"totalPages", Int64.Type}, {"data.id", Int64.Type}, {"data.firstName", type text}, {"data.lastName", type text}, {"data.dateOfBirth", type date}, {"data.standardId", Int64.Type}, {"data.status.id", Int64.Type}, {"data.status.text", type text}, {"data.estimatedStartDate", type date}, {"data.estimatedEndDate", type date}, {"data.esfaCertificateClaimedAt", type any}, {"data.createdAt", type datetime}, {"data.archivedAt", type any}})
in
    #"Expanded Column1"
If you're copying the above, be sure to add your own API token.
Rename the apprentices query to "getPage" just to make things easier to understand.
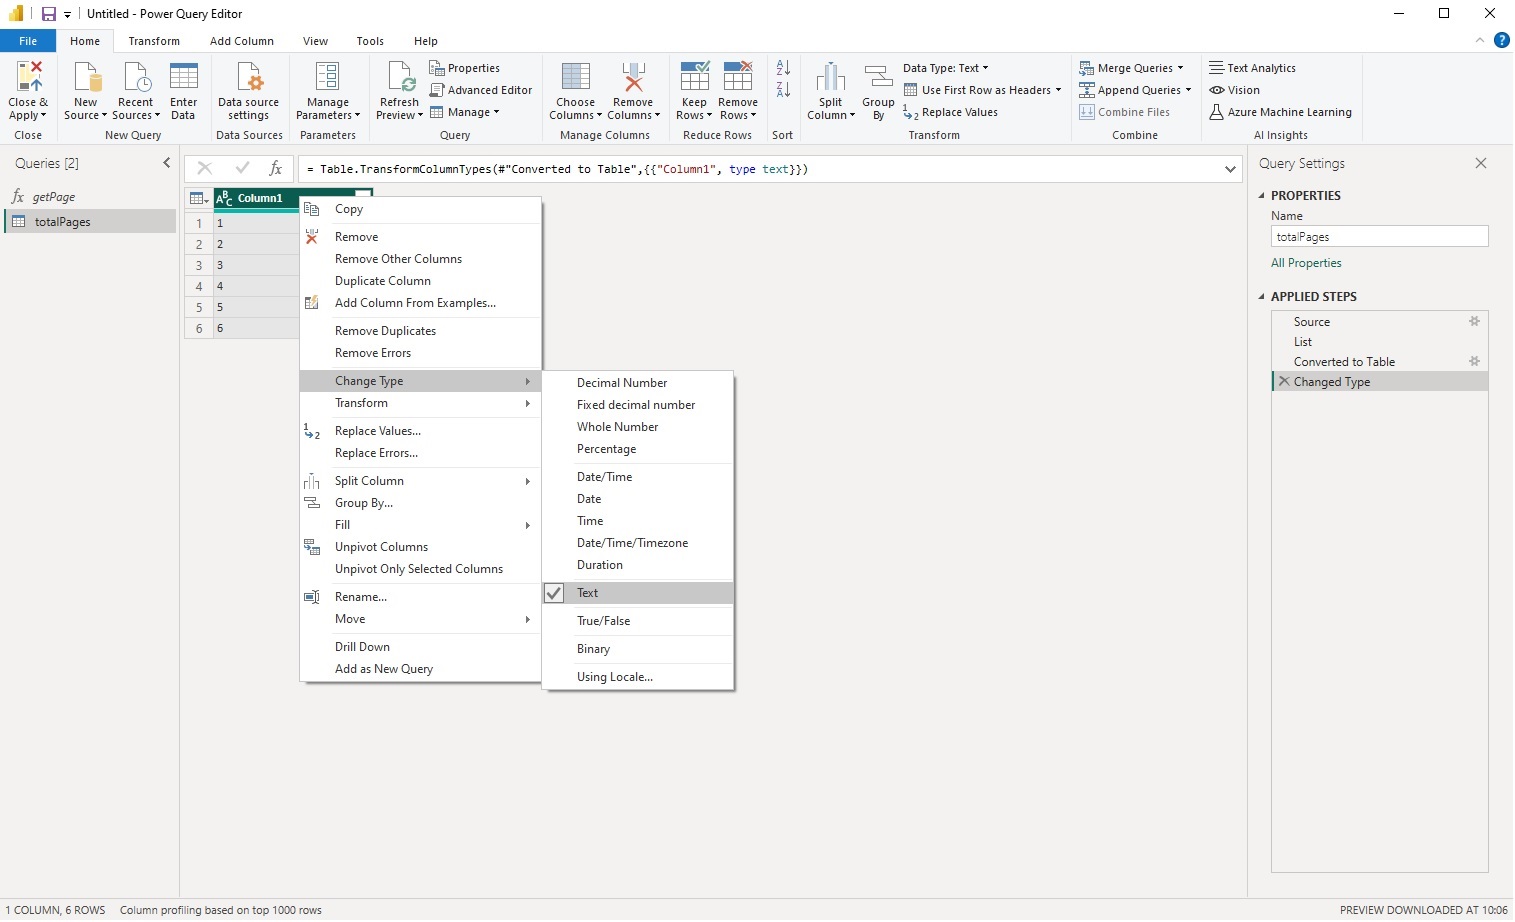
Back at the totalPages table, we need to convert Column1 to text:
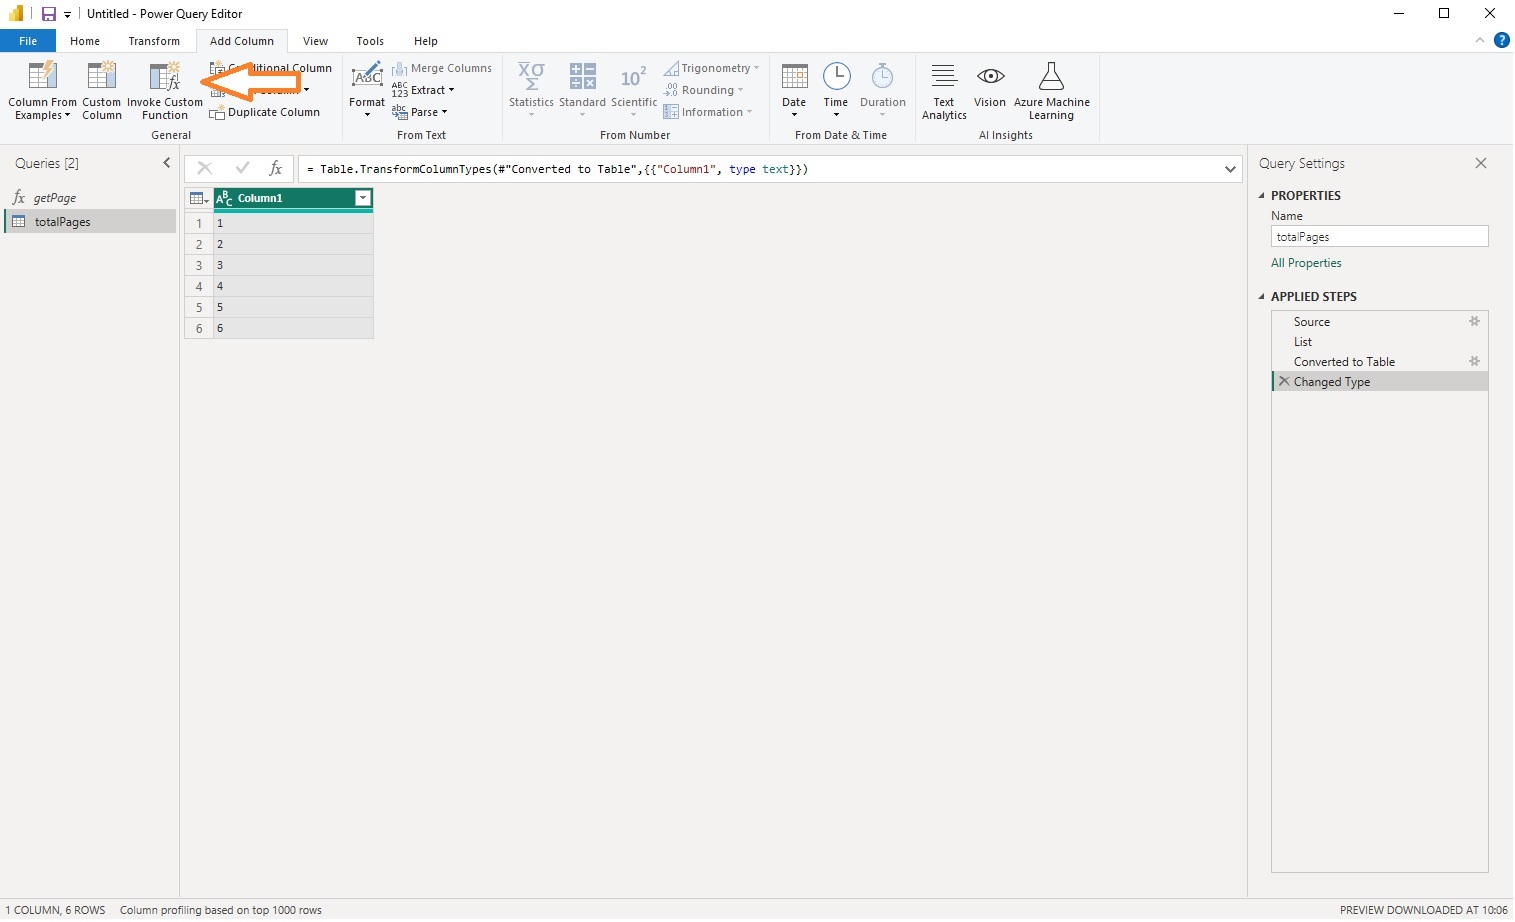
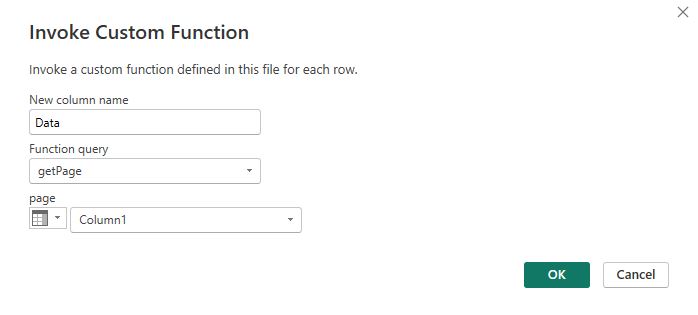
The final step in this process is to add a new column and call our custom getPages function.
Configure this window like so:
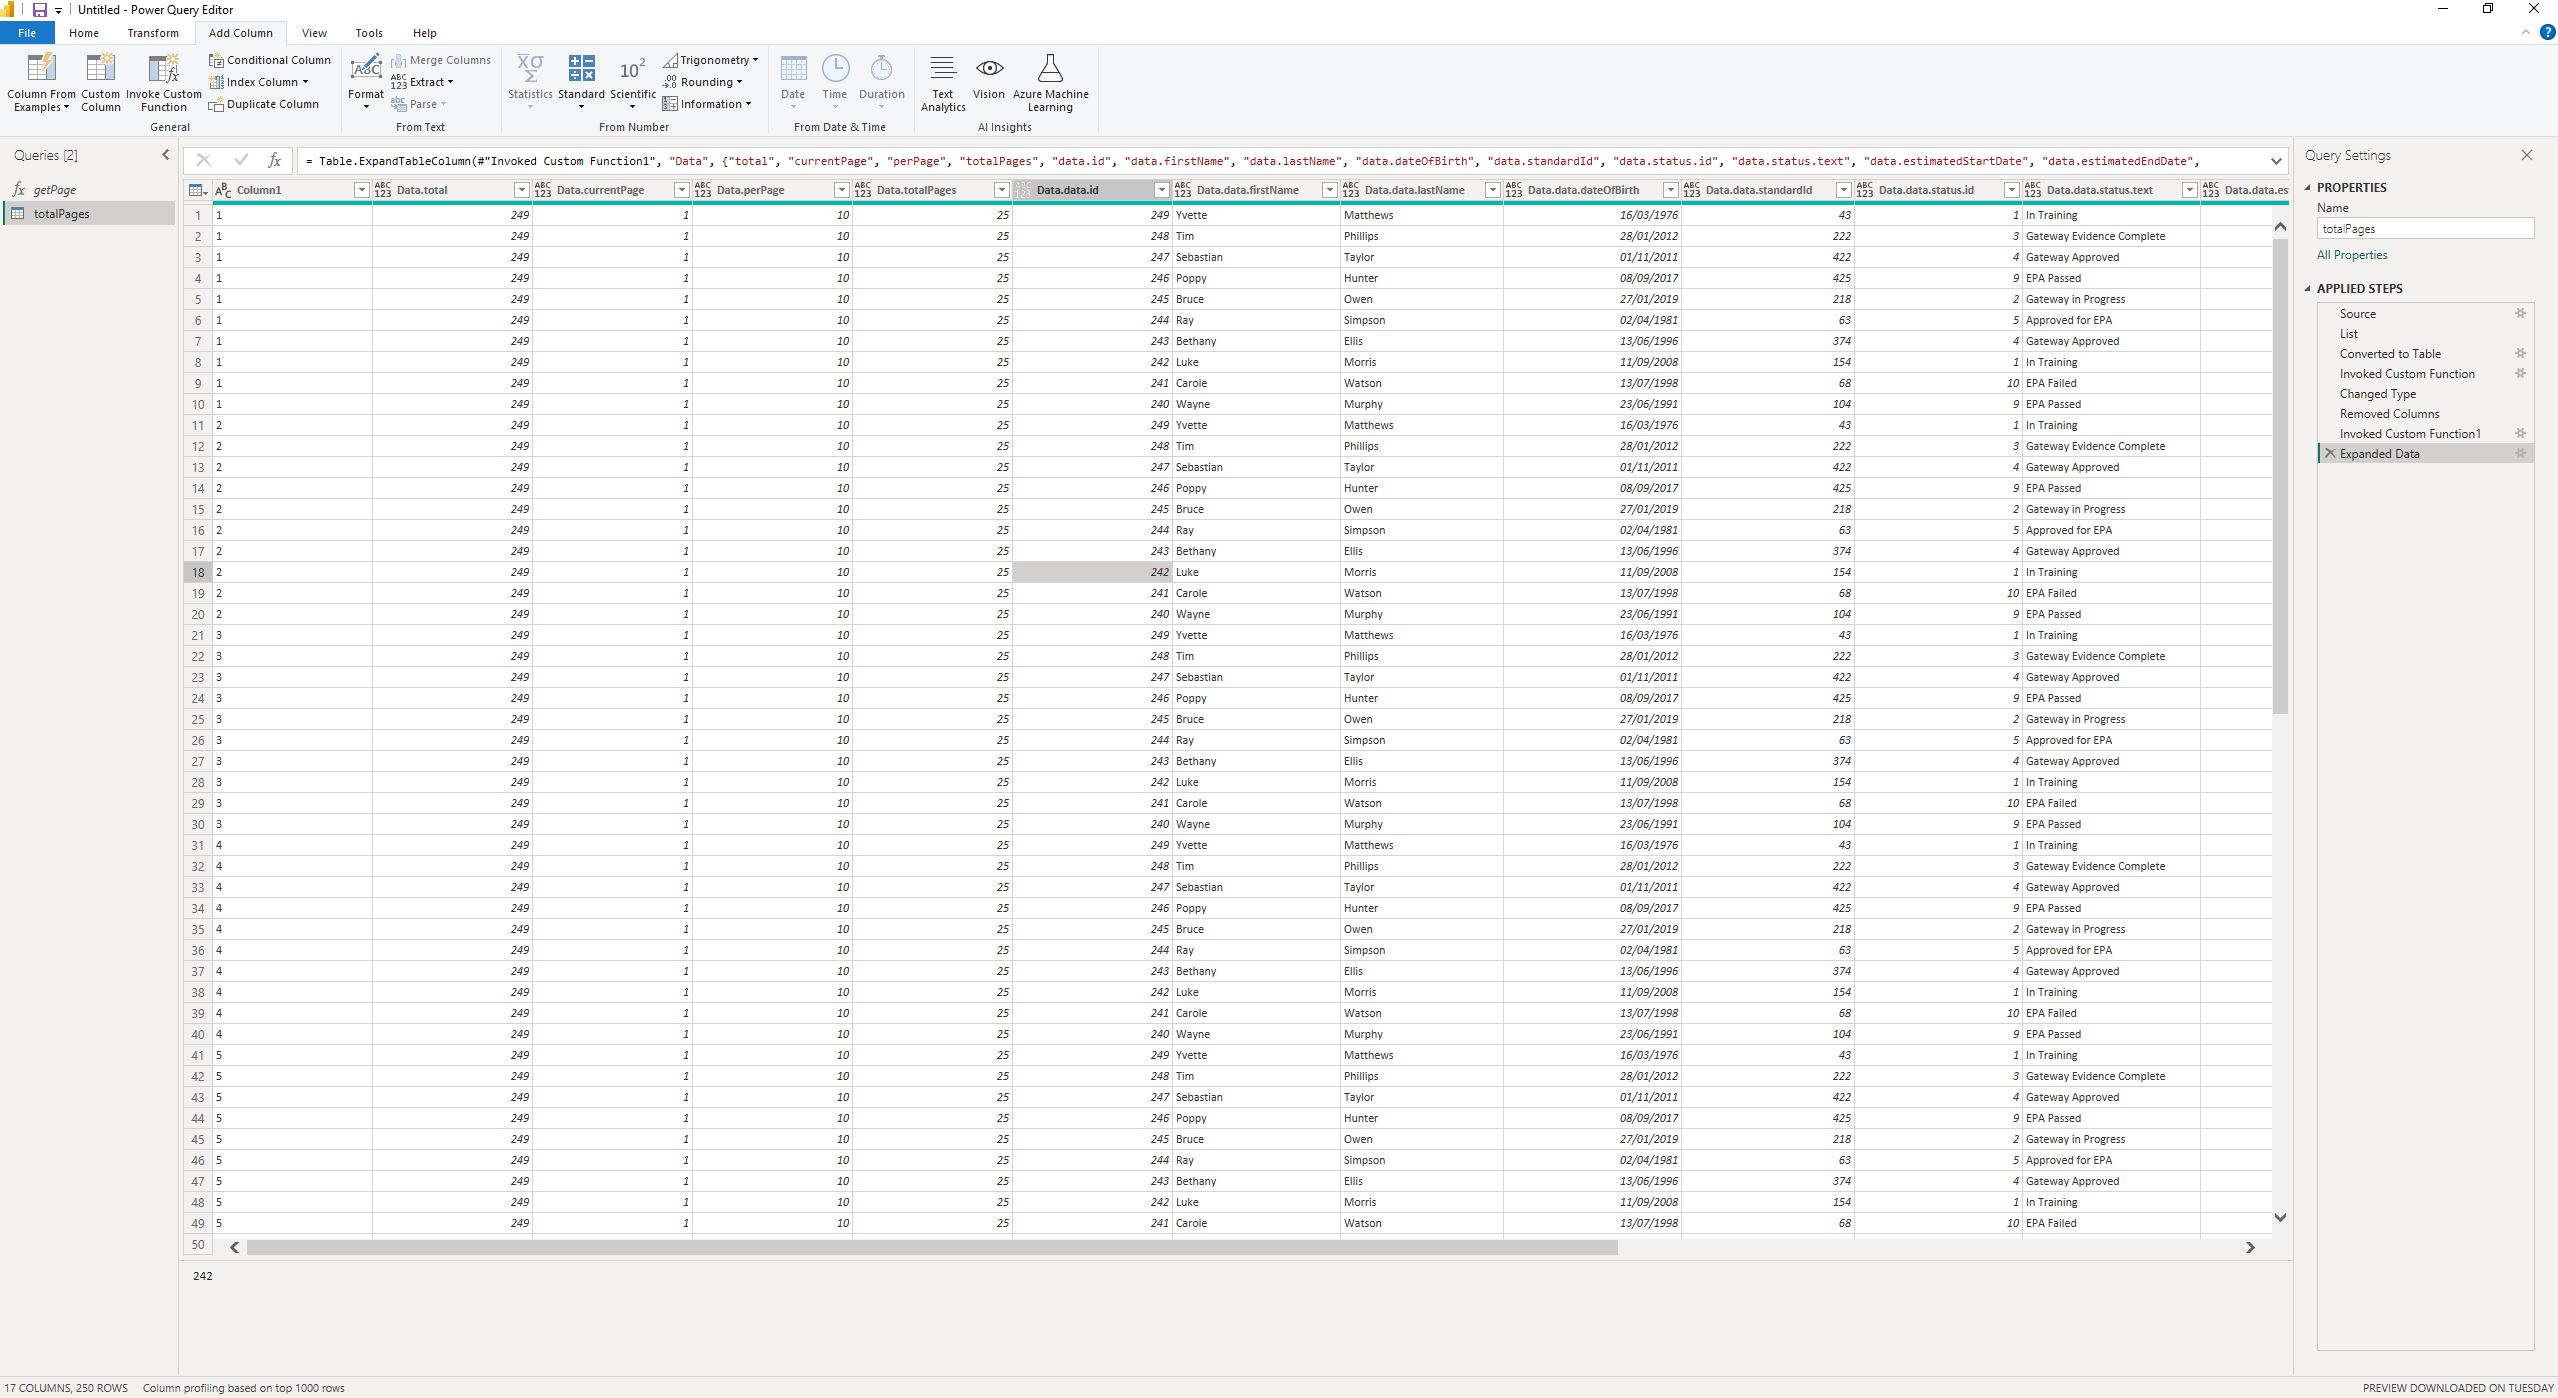
Click OK.
You should now see a new column called Data. Expand this column and you'll see every page of results from Connect.
All that's left is to click "Close & Apply" and your data will be ready to work with.
Summary
By following the above steps you should be armed with enough information to get paginated data out of ACE360 Connect and into Power BI.
Our API responses have a shared structure. So the steps above should be repeatable for any of our paginated GET endpoints.
Next Steps
If you intend to share your data sources be sure to remove your API key first. Your API key is private and unique to you. Each API user should have their own API key.
We're working on expanded support for Power BI, so check back here in the future for additional guides and support. If you have suggestions or wisdom to share with us regarding Power BI we'd love to hear about it.
In the meantime, why not check out some of our other guides.
 ACE360 Connect Documentation